In this post, we will get to know how to authenticate in a MEAN stack application. The MEAN stack refers to javascript based technologies MongoDB, Express JS, Angular, and Node Js. Here, we are using angular version 9. Our application has registration, login, and protecting only logged in users pages, managing sessions on the client side even after refreshing the pages and logout.
I hope this should be a good example of mean stack authentication projects. We are going to use bcrypt hashing for storing passwords, JWT for authenticating users’ token, angular interceptor, and router guard for managing sessions in client sides.
You can also check out my repo to see my full code that this blog is going to be explained.
Prequest:
If you are going to practice the following code. Please ensure that you already have basic knowledge with mean stack and you have already installed Node Js, Express Js generator, MongoDB, and Angular.
Create an Express js application for server-side:
Now, we should create a server-side application using the express-generator command. If you are not already installed install it by “npm install -g express-generator”. Create an “express server –no-view” then move to the “server folder” now you can run the server by “npm run start”. This is a starter kit generated from the express-generator. Now we can start to code from here and copy the config code repo.
Mongoose Installation Command:
npm i mongoose --save
MongoDB connection setup by mongoose:
We will create a MongoDB connection by using the mongoose connect method.
db/mongoose.js
function connect(){
mongoose.connect('mongodb://localhost/'+ config.db.name +'?authSource=admin', {
 useNewUrlParser: true,
 useUnifiedTopology: true,
 useCreateIndex: true,
 user:config.db.user,
 pass: config.db.password
}).then(() => console.log('database connection successful'))
 .catch((err) => console.error('database not connection successful', err));
}
module.exports = {
connect: connect
};
Import this file on app.js and call the connect method. It will call the MongoDB connection on the app start.
var mongoDB = require('./db/mongoose');
mongoDB.connect();
Create Users Schema:
Now we need to set up the Mongoose users schema for MongoDB database setup. Create user files in the model’s folder (you need to create models folder manually) schema for registration and login set up.
Let’s create users schema:
models/users.js
I have also built custom static methods to getUser, saveUser, and password hashing using mongoose statics. The mongoose pre hooks to capture the save query to hashing the password. Hashing the password is very important to protect the data(I have used bcrypt here).
var UsersSchema = new mongoose.Schema({
_id: mongoose.Types.ObjectId,
email: { type: String, unique: true, required: true},
password: {type: String, unique: true, required: true}
});
UsersSchema.index({email: 1}, { unique: true});
UsersSchema.index({email: 1}, { unique: true});
UsersSchema.pre('save', function(next){
const user = this;
bcrypt.hash(user.password, function (err, hash){
 if (err) {
  return next(err);
 }
 user.password = hash;
 next();
})
});
UsersSchema.statics.getUser = function (email) {
return new Promise((resolve, reject)=>{
  this.findOne({email: email}, function (err, user) {
       if(!err){
        resolve(user);
   }else {
    reject({
     error: err.message
    });
   }
 });
});
};
UsersSchema.statics.saveUser = function (user) {
return new Promise((resolve, reject)=>{
 this.create(user, function (err, result) {
  if(!err){
   var createdUser = JSON.parse(JSON.stringify(result._doc));
   resolve(createdUser);
  }else {
   reject({
    error: err.message
   })
  }
 })
})
};
UsersSchema.statics.getUsers = function (query) {
return new Promise((resolve, reject) => {
  this.find(query).select({
 email: 1
 }).then((result)=>{
   resolve(result)
 }).catch(err=>reject(err))
});
};
var Users = mongoose.model('Users', UsersSchema, 'users');
module.exports = {
Users: Users
};
So the next thing is we are going to write the routers to log in, register. If you use express-generator users, the router file will be available in routes by default. So you don’t need to create anything else to create users.js file routes. and add the following code. Here we are going to create APIs for Register, login, and other APIs related to Users.
routes/users.js
Register API:
You can see the following code whenever the user payload comes to our registration API. First, we need to check out the user-provided data in the correct format. Then to check if the provided email is already registered we are using Users.getUser method to check. If the email was not already registered we need to save the payload by Users.saveUser(new Users(user)). whenever you insert data it should have the specified schema. For that
I am formatting by using the Users modal class.
router.post('/register', function (req,res) {
 const user = req.body;
 Users.getUser(user.email).then((userDoc)=>{
   if(userDoc){
     res.status(200).send({
       error: 'Entered email already exists'
     });
     return;
   }
   Users.saveUser(new Users(user)).then((result)=>{
     delete  result.password;
     res.status(202).send({
       token: jwt.sign({userId: result._id}),
       data: result
     })
   }).catch((error)=>{
     res.status(400).send({
       error: error.error
     });
   });
 }).catch((error)=>{
   res.status(400).send({
     error: 'Something went wrong'
   });
 });
});
Login API:
First, we will see the login code in below here we are checking if an email is available then comparing the password finally giving access-token to access the secure pages.
I have used JWT for user tokens we don’t need to maintain on the server-side. If you want to use any other methods also you can go with that.
router.post('/login', function (req, res) {
 const user = req.body;
 Users.getUser(user.email).then((userDoc)=>{
   if(!userDoc){
     res.status(200).send({
       error: 'Entered invalid email'
     });
     return;
   }
   bcrypt.compare(user.password, userDoc.password, (err, result)=>{
     if(err || !result){
       res.status(200).send({
         error: 'Entered Wrong password'
       });
       return;
     }
     delete userDoc.password;
     res.status(202).send({
       token: crypto.generateToken(userDoc._id),
       data: userDoc
     })
   });
 }).catch((error)=>{
   res.status(400).send({
     error: 'Something went wrong'
   });
 });
});
Now we will create an API that only accesses logged in users. Let’s see.
router.get('/', auth, function(req, res, next) {
 Users.getUsers({}).then((result)=>{
   res.status(200).send({
     data: result
   });
 }).catch((err)=>{
   res.status(400).send({
     error: err.error
   });
 })
});
Here we are using middleware to check the APIs come with a valid access token. Then decoded user data stores it in req.body.auth to get the user info in API handlers.
Create middlewares/auth.js and load the following code.
function auth(req, res, next) {
const accessToken = req.headers['access-token'];
if (accessToken){
 const decoded = jwt.decode(accessToken);
 if(decoded){
   req.body.auth = { userId: decoded.payload.userId};
  next();
 }else{
  res.status(401).send({
   error: Access token is expired'
  })
 }
}else {
 res.status(401).send({
  error: 'You don't have access to this api'
 })
}
}
The server-side part is completed now we will see the client-side to authenticate the user and manage the user sessions. In this blog, I am going to explain it in Angular 9
but it’s also suitable for angular 5+.
Before going to you need to create the angular app. Create it by ng new command. If you are not already installed, install angular by using the following command. I have also using angular material here for building UI. The installation reference link is here. Angular material Installation guide
npm i -g @angular/cli
Then we need to create components for login, register, and users list page. Create it by the following command if you are not already familiar with this.
 ng generate component views/public/login
   ng generate component views/public/register
   ng generate component views/secured/login
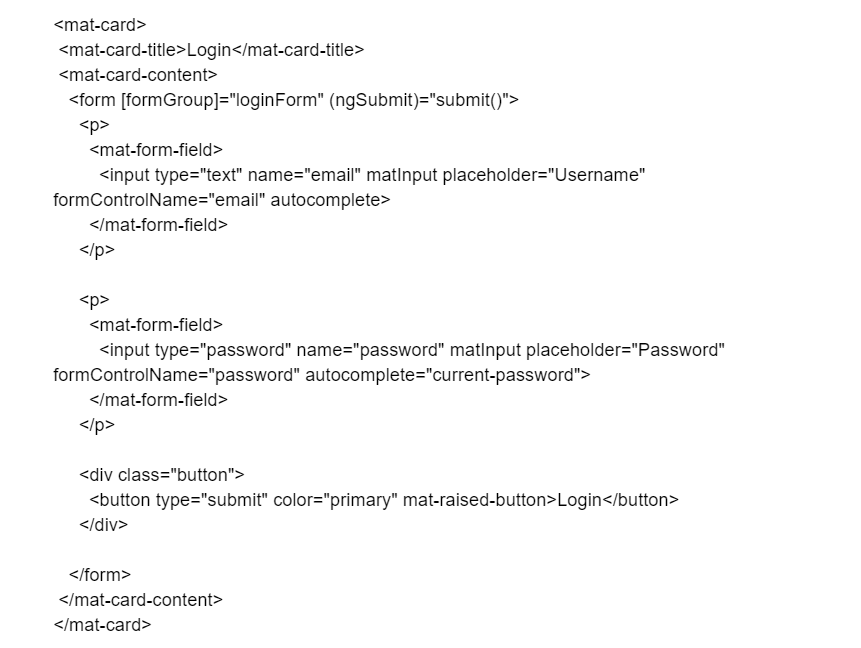
Then build UI for those components. I have created something simple. That’s available in my repo The link was already mentioned above. Here I will show the example code for login. Then it’s also similar to registration. I have used reactive form module for forms so you need to import ReactiveFormsModule.
Once after creating those components you need to declare the import dependency module in the app module and set the path in the router module. You can see the router guards (canActivate: [AuthGuardService]) in this code. This is used to determine whether the path can load in view or not.
The AuthGuardService service is used to protect the secured pages from unauthorized users and NoAuthGuardService used to when logged in users accessing the login and
Registration page.
Create those files by the following command
   ng generate service core/guards/auth-guard
   ng generate service core/guards/no-auth-guard
You can copy the full source from my repo. I am just explaining the core part. When the token is not available in not allowing the navigation and returning to login. Try to navigate the user’s page before login. It will redirect to the login page.
auth-guard.service.ts
canActivate(
 route: ActivatedRouteSnapshot,
 state: RouterStateSnapshot
): Observable | Promise | boolean {
 const isLoggined = localStorage.getItem(StorageKeys.TOKEN);
 if (!!isLoggined) {
   return true;
 }
 this.router.navigateByUrl('/login');
 return  false;
}
Here, No Authguard service is just explaining the core part. When the token is available in not allowing the navigation and returning to users page. Once after login, try to log in it will redirect you to the users page.
no-auth-guard.service.ts
canActivate(
 route: ActivatedRouteSnapshot,
 state: RouterStateSnapshot
): Observable | Promise | boolean {
 const isLoggined = !!localStorage.getItem(StorageKeys.TOKEN);
 if (isLoggined) {
   this.router.navigateByUrl('/users');
   return false;
 }
 return true;
}
App.router.module.ts
const routes: Routes = [
 {
   path: '',
   redirectTo: 'login',
   pathMatch: 'full'
 },
 {
   path: 'login',
   component: LoginComponent,
   canActivate: [NoAuthGuardService]
 },
 {
   path: 'register',
   component: RegisterComponent,
   canActivate: [NoAuthGuardService]
 },
 {
   path: 'users',
   component: UsersComponent,
   canActivate: [AuthGuardService]
 }
];
@NgModule({
 imports: [RouterModule.forRoot(routes)],
 exports: [RouterModule]
})
export class AppRoutingModule { }
App.module.ts
@NgModule({
 declarations: [
   AppComponent,
   LoginComponent,
   RegisterComponent,
   UsersComponent
 ],
 imports: [
   BrowserModule,
   AppRoutingModule,
   ReactiveFormsModule,
   BrowserAnimationsModule,
   MatCardModule,
   MatInputModule,
   MatButtonModule,
   MatFormFieldModule,
   CoreModule,
   HttpClientModule
 ],
providers: [
 {provide: HTTP_INTERCEPTORS, useClass: AuthInterceptor, multi: true}
]
 bootstrap: [AppComponent]
})
export class AppModule { }
The example code for the login component.
Note, I am not showing error and error not handled correctly in the component.
login.component.html
login.component.ts
@Component({
 selector: 'app-login',
 templateUrl: './login.component.html',
 styleUrls: ['./login.component.scss']
})
export class LoginComponent implements OnInit {
 public loginForm: FormGroup;
 constructor(
   public formBuilder: FormBuilder,
   private router: Router,
   private api: ApiService,
 ) {
   this.loginForm = this.formBuilder.group({
     email: new FormControl('', Validators.compose([
       Validators.required, Validators.email
     ])),
     password: new FormControl('', Validators.compose([
       Validators.required,
       Validators.minLength(8)
     ])),
   });
 }
 ngOnInit() {
 }
 submit() {
   this.api.login(this.loginForm.value).subscribe((res) => {
     if (res && !res.error) {
       localStorage.setItem(StorageKeys.TOKEN, res.token);
       this.router.navigateByUrl('/users');
       return;
     }
   })
 }
}
So you can see the above code when the form values are valid and sent to the server if there is no error storing the access token in localStorage and navigating. You need to create an API service file to send the data.
auth.interceptor.ts
@Injectable()
export class AuthInterceptor implements HttpInterceptor {
 constructor(
   private router: Router,
 ) {
 }
 intercept(request: HttpRequest, next: HttpHandler): Observable<HttpEvent> {
   const userData = localStorage.getItem(StorageKeys.TOKEN);
   if (userData) {
     let headers = request.headers.append('access-token', userData['access-token']);
      request = request.clone({
       headers
     });
   }
   if (!/(login|register)/.test(request.url) && !userData) {
     this.clearSessionState();
     return EMPTY;
   }
   return next.handle(request).pipe(
     catchError((res) => {
       // when session closed move to sign in page
       if (res instanceof HttpErrorResponse && res.status === 401) {
         this.clearSessionState();
       }
       return throwError(res);
     })
   );
 }
 clearSessionState() {
   localStorage.clear();
   this.router.navigateByUrl('/login');
 }
}
Finally coming to the conclusion You can run the project from my repo and I hope you enjoyed the blog. Thanks for reading if you have any questions or found any suggestions, so write it in the comments section.
We, Agira technologies are a technology solution company with business services and domain solutions that support global clients who comprise the current world economy. Some of the exclusive services that we offer are web development, mobile app development, Blockchain, IoT, and DevOps Consulting.
Do you find it interesting? you might also like these articles. Top 10 Best Tech Companies For Employees To Work In The USA In 2020 and Top 10 IT Staffing and Recruiting Agencies in the USA.
If you have a business idea in your mind and in search of a reliable web development company, you are in the right place. Hire the best web developers in the industry from Agira technologies.


