Table of Contents
Angular provides two different approaches to handle forms namely reactive and template-driven forms. Both the strategies process and manage the forms differently. If the form processing work is not much, template-driven forms can be used and most of the processing work takes place in the template.
Reactive forms maintain a structured data model and form model is created explicitly in the component class which is more apt for large form processing works and the code resides in the component class. Choosing between these two approaches depends on the scenario for which the form is created.
This blog focuses on Reactive forms starting from creating a form control, grouping form controls, generating controls, grouping with form builder service and progresses to form validations.
Overview of reactive forms
In reactive forms, we set up a form model in the component class and associate it with the form elements in the template. Form model defines form control instances, initial value, validations for each form element.
The instance and the form elements are linked with the help of directives provided by the ReactiveFormsModule. Once the link is created the value and status of the form controls can be tracked in the component class with the help of methods and properties defined in the respective classes.
To work with reactive forms import ReactiveFormsModule in app.module.ts and add it to the import array.
import { ReactiveFormsModule } from '@angular/forms';
@NgModule({
 imports: [
   ReactiveFormsModule
 ],
 providers: [],
 bootstrap: [AppComponent]
})
export class AppModule { }
Creating a single form control
In reactive forms, most of the form processing work takes place in the component class. To create a form control,
Import FormControl class in the component in which reactive forms is to be used for creating an instance for the imported class
import { FormControl } from '@angular/forms';
export class ReactiveFormComponent implements OnInit {
 empName = new FormControl('');
}
Here, the empty string is passed in the FormControl constructor as an initial value. One can pass any value that has to be set as an initial value for the form element.
In the template file register the empName FormControl instance to the form input element by binding to the [formControl] provided by the FormControlDirective as below.
Enter employee name:
<input type="text" [formControl]="empName">
This links the FormControl instance to the form input element. The value and changes of the input element can be captured in the component class file using the FormControl instance.
Accessing form control value
The value of the form control can be accessed with the help of value property or valueChanges observable.
- The value property provides the current value of the form element at any time.
- To get notified with the changes in the form element valueChanges property can be used which returns an observable. Observables can be accessed using subscribe() method in the component file and async pipe in the template file.
export class ReactiveFormComponent implements OnInit {
 empName = new FormControl('');
 empNameValue: string;
 constructor() { }
 ngOnInit() {
   this.empName.valueChanges.subscribe(
     res => this.empNameValue = res
   );
 }
}
For displaying values in the template you can use,
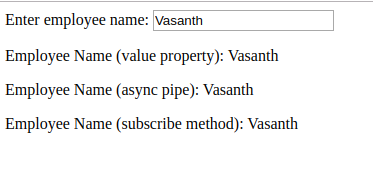
<p>Employee Name (value property): {{empName.value}}</p>
<p>Employee Name (async pipe): {{empName.valueChanges | async}}</p>
<p>Employee Name (subscribe method): {{empNameValue}}</p>
The output looks as below
Creating a form group
Import FormGroup and FormControl classes.
import { FormControl, FormGroup } from '@angular/forms';
Component class file
export class ReactiveFormComponent implements OnInit {
 empForm = new FormGroup({
   name: new FormControl(''),
   designation: new FormControl(''),
   email: new FormControl('')
 });
}
The form group maintains the value and status of a group of form controls. Now, we can create an instance for a form group and pass an object of named keys and form control instance as values.
Template file
<form [formGroup]="empForm">
Name: <br />
<input type="text" formControlName="name"> <br /><br />
Designation: <br />
<input type="text" formControlName="designation"> <br /><br />
Email ID: <br />
<input type="text" formControlName="email">
</form>
<p>
 Employee Form Value: {{empForm.value | json}}
</p>
In this template, form group instance is bound to the FormGroupDirective in the form tag and the form controls are assigned to the FormControlName directive.
Output

Generating Form model with FormBuilder service
FormBuilder is a service provided in the reactive forms module. It provides factory methods to create form control, group and array. Let’s create a form model with the help of FormBuilder service.
For that lets first import FormBuilder and inject it in the constructor.
import { FormBuilder } from '@angular/forms';
export class ReactiveFormComponent implements OnInit {
 empForm = this.fb.group({
   name: [''],
   designation: [''],
   email: ['']
 });
 constructor(private fb: FormBuilder) { }
}
The above lines of code show the form model implemented using FormBuilder service. The template file remains the same as previous in the form group section.
Managing form control values
So far, build the form model using form control, form group and form builder service and associate the form model in the template. Let’s get into managing form control values, accessing control in a form group, setting values to controls.
To access a form control defined in the form group,
this.empForm.get('name');
Form controls can be used at many places in our application so it is better to create getter methods instead of accessing form control every time with the get() method of the form group.
get name() { return this.empForm.get('name'); }
get designation() { return this.empForm.get('designation'); }
get email() { return this.empForm.get('email'); }
Angular provides numerous properties to get information about a control such as value, status, valid, invalid, touched, untouched, dirty, pristine and more. With the getter methods defined above, one can access all the form control properties since those methods return a form of control.
There are two methods to update model value namely setValue() and patchValue(). setValue() method can be used to set value for all the controls defined in the form group; patchValue() method can be used to set the value to specific controls in the form group.
Updating using setValue() – update values for all the controls
this.empForm.setValue({
   name: 'Peter',
   designation: 'Test Engineer',
   email: 'peter@gmail.com'
});
Updating using patchValue() – update values for only name and email control
this.empForm.patchValue({
   name: 'Jaffer',
   email: 'jaffer@gmail.com'
});
Form Validation
There are 2 types of validators such as sync and async validators. Sync validators are passed as the second argument in the form control constructor, whereas the async validators are passed as the third argument. But, now we will have a closer look only on sync validators.
Angular provides a set of common built-in validator functions such as required, email, pattern, minLength, maxLength and more. One can also create their own custom validator functions to handle the desired validations.
First, let’s have a look at adding built-in validators to the form model.
empForm = this.fb.group({
   name: ['', Validators.required],
   designation: ['', Validators.minLength(5)],
   email: ['', Validators.email]
});
The above code includes required validator to name control, minLength validator to designation control and email validator to email control.
email: ['', [Validators.required, Validators.email]]
This shows how to add multiple validators to a single form control email. To add more than one validator just pass the validator functions in the array.
The validation functions run whenever there is a change in the form control by default. It is possible to change when the validation functions should run with the updateOn property. This updateOn property sets when the control should update itself.
The possible values for the property are ‘change’, ‘blur’ and ‘submit’. This can be specified in the form control as below:
email: ['', {updateOn: 'blur'}]
To have both validators and updateOn for a control refer below,
email: ['', {validators: [Validators.required, Validators.email], updateOn: 'blur'}]
Displaying an error message in the template.
<form [formGroup]="empForm">
 <label>Email</label>
 <input type="text" formControlName="email">
</form>
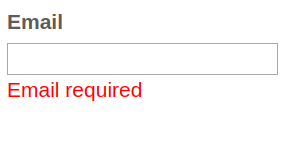
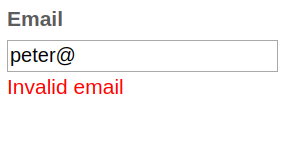
<div class="error-msg" *ngIf="email.hasError('required') && email.touched">Email required</div>
<div class="error-msg" *ngIf="email.hasError('email') && email.touched">Invalid email</div>
Custom Validator
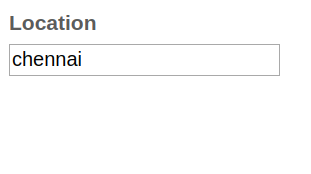
Custom validators are created for special purposes which cannot be achieved by the built-in validators. Here, we have a location form control for which locationValidator is added and a regular expression is passed to the validator function.
empForm = this.fb.group({
  location: ['', {validators: locationValidator(/pune/i), updateOn: 'blur'}]
});
get location() {
  return this.empForm.get('location');
}
The purpose of the locationValidator is to restrict the city ‘pune’ and its function definition is given below
export function locationValidator(cityReg: RegExp): ValidatorFn {
 return (control: AbstractControl): {[key: string]: any} | null => {
   const restrictedCity = cityReg.test(control.value);
   return restrictedCity ? {'restrictedCity': {value: control.value}} : null;
 };
}
Validator functions always return either an error object or null that indicates invalid and valid status respectively. The above custom validator function checks whether the form element value matches the regular expression and if the match occurs, an error object with key ‘restrictedCity’ is returned else null.
Displaying the error message in the template.
<form [formGroup]="empForm">
 <label>Location</label>
 <input type="text" formControlName="location">
</form>
<div class="error-msg" *ngIf="location.hasError('restrictedCity') && location.touched">City not allowed</div>

Crossfield validation
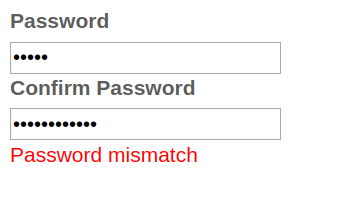
In previous examples, separate validators have been added to individual controls and hence each control is validated separately. There may be cases where control is validated with the help of another control, for example, password and confirm password field. In this scenario, the validation is added to the common parent control and here it is FormGroup.
Component class file
passwordForm = this.fb.group({
   password: [''],
   confirm_password: ['']
 }, {validators: this.passwordMatchValidator.bind(this), updateOn: 'blur'}
);
passwordMatchValidator(group: FormGroup) {
   const pwd = group.controls.password.value;
   const confirm_pwd = group.controls.confirm_password.value;
   if (pwd && confirm_pwd && pwd !== confirm_pwd) {
     return group.controls.confirm_password.setErrors({mismatch: true});
   } else {
     return group.controls.confirm_password.setErrors(null);
   }
}
The passwordMatchValidator gets the reference to the form group and compares the password and confirm_password value. If both values are not equal sets ‘mismatch’ error else sets error to null.
Template File
<form [formGroup]="passwordForm">
 <label>Password</label>
 <input type="password" formControlName="password">
 <label>Confirm Password</label>
 <input type="password" formControlName="confirm_password">
</form>
<div class="error-msg" *ngIf="passwordForm.controls.confirm_password.hasError('mismatch') && passwordForm.touched">
 Password mismatch
</div>
EndNote
This Guide covers the overall working of reactive forms, If you find this interesting and want to learn more about reactive forms you can go to Angular Documentation to learn more about it.
Reactive forms are more powerful to handle complex applications by separating form processing logics and template design. As well as reactive forms have explicit form model setup, synchronous access to form controls, structured data model. Happy Learning!
Want some more cool tutorials on Angular? Why not take a look around! Discover our top featured Angular blogs. Subscribe for an exclusive weekly newsletter to stay up to date on the development technologies.
Searching for the perfect ways to develop an application for your business? Our technology specialists are happy to guide you! Hire Angular developers today to accomplish the needs of your business with our brilliant solutions.


