Table of Contents
APIs will always use tokens to authenticate users. The reason behind this approach is, usually, there is no session state provided between the requests. To avoid this, Laravel introduced Laravel Passport which makes API authentication an easy task by providing a full OAuth2 server implementation for the entire application.
In this tutorial, we are going to discuss about how we can write REST API in Laravel with Passport authentication. As we all know, REST is the most efficient and widely used standard for API creation. Laravel is also evolved as the best supporting platform for creating APIs. Authentication of APIs are very imperial factor for any application so to achieve the high-level authentication Laravel uses a powerful concept called ‘Laravel Passport’.
Let’s see how we can create a REST API in Laravel with authentication using passport,
Create A Fresh Application
Will start with creating a new Laravel application, now run the following command to create the application
composer create-project --prefer-dist laravel/laravel laravel-passport
After that, we have to install Passport package using the following command
composer require laravel / passport
Once the package is installed, we have to update the config/app.php file by adding the following service provider
config/app.php
'providers' =>[
Laravel\Passport\PassportServiceProvider::class,
],
After the successful registration of passport service provider, we have to run migration files. It will add several new tables in the database. To run the migration, use the following command
php artisan migrate
Next is the process of installing a passport in our application. We can use the following command to install a passport.
php artisan passport:install
We need to generate encryption keys to get a secure access token and you can create it by running the above command.
In next step, we have to configure passport. We have to make changes in three files to do the passport configuration.
- Add the Laravel\Passport\HasApiTokens trait to the App\User model. It will provide some helper methods to our model, which is helpful for us to check the authenticated user’s token and scopes.
Best To Read: Top 10 Laravel Blogs You Must Not Miss
app/user.php
<?php
namespace App;
use Illuminate\Notifications\Notifiable;
use Illuminate\Foundation\Auth\User as Authenticatable;
Use Laravel\Passport\HasApiTokens;
class User extends Authenticatable
{
 use HasApiTokens, Notifiable;
/**
* The attributes that are mass assignable.
*
* @var array
*/
protected $fillable = [
'name', 'email', 'password',
];
/**
* The attributes that should be hidden for arrays.
*
* @var array
*/
protected $hidden = [
'password', 'remember_token',
];
}
- We have to add the Passport::routes method in the boot method of the AuthServiceProvider. The reason why we are adding it here is, that it will register the necessary routes that are required to issue access and revoke the access tokens.
<?php
namespace App\Providers;
use Laravel\Passport\Passport;
use Illuminate\Support\Facades\Gate;
use Illuminate\Foundation\Support\Providers\AuthServiceProvider as ServiceProvider;
class AuthServiceProvider extends ServiceProvider
{
   /**
    * The policy mappings for the application.
    *
    * @var array
    */
   protected $policies = [
       'App\Model' => 'App\Policies\ModelPolicy',
   ];
   /**
    * Register any authentication / authorization services.
    *
    * @return void
    */
   public function boot()
   {
       $this->registerPolicies();
       Passport::routes();
   }
}
- Next, in our config/auth.php file, we have to set the driver option from “API authentication guard” to passport. This will enable our application to use the Passport’s token guard at the time of authenticating API requests.
'guards' => [
'web' => [
'driver' => 'session',
'provider' => 'users',
],
'api' => [
'driver' => 'passport',
'provider' => 'users',
],
]
Create API Routes
Next step is to create API routes, Laravel provides api.php file for writing all the web services route which you can find it inside the route directory.
<?php
/*
|--------------------------------------------------------------------------
| API Routes
|--------------------------------------------------------------------------
|
| Here is where you can register API routes for your application. These
| routes are loaded by the RouteServiceProvider within a group which
| is assigned the "API" middleware group.
|
*/
Route::post('login', 'api\UserController@login');
Route::post('signup', 'api\UserController@signup');
Create Controller
We need to create a controller and some API methods inside the controller.
<?php
namespace App\Http\Controllers\API;
use Illuminate\Http\Request;
use App\Http\Controllers\Controller;
use App\User;
use Illuminate\Support\Facades\Auth;
use Validator;

class UserController extends Controller
{
   public function login(){
       if(Auth::attempt(['email' => request('email'), 'password' => request('password')])){
           $user = Auth::user();
           $success['token'] =  $user->createToken('LaraPass')-> accessToken;
           return response()->json(['success' => $success], $this-> successStatus);
       }
       else{
           return response()->json(['error'=>'Unauthorised'], 401);
       }
   }

   public function signup(Request $request)
   {
       $request->validate([
           'name' => 'required|string',
           'email' => 'required|string|email|unique:users',
           'password' => 'required|string|confirmed'
       ]);
       $user = new User([
           'name' => $request->name,
           'email' => $request->email,
           'password' => bcrypt($request->password)
       ]);
       $user->save();
       return response()->json([
           'message' => 'Successfully created user!'
       ], 201);
   }
}
Related: How To Create A Custom Validation Rule In Laravel
Testing API
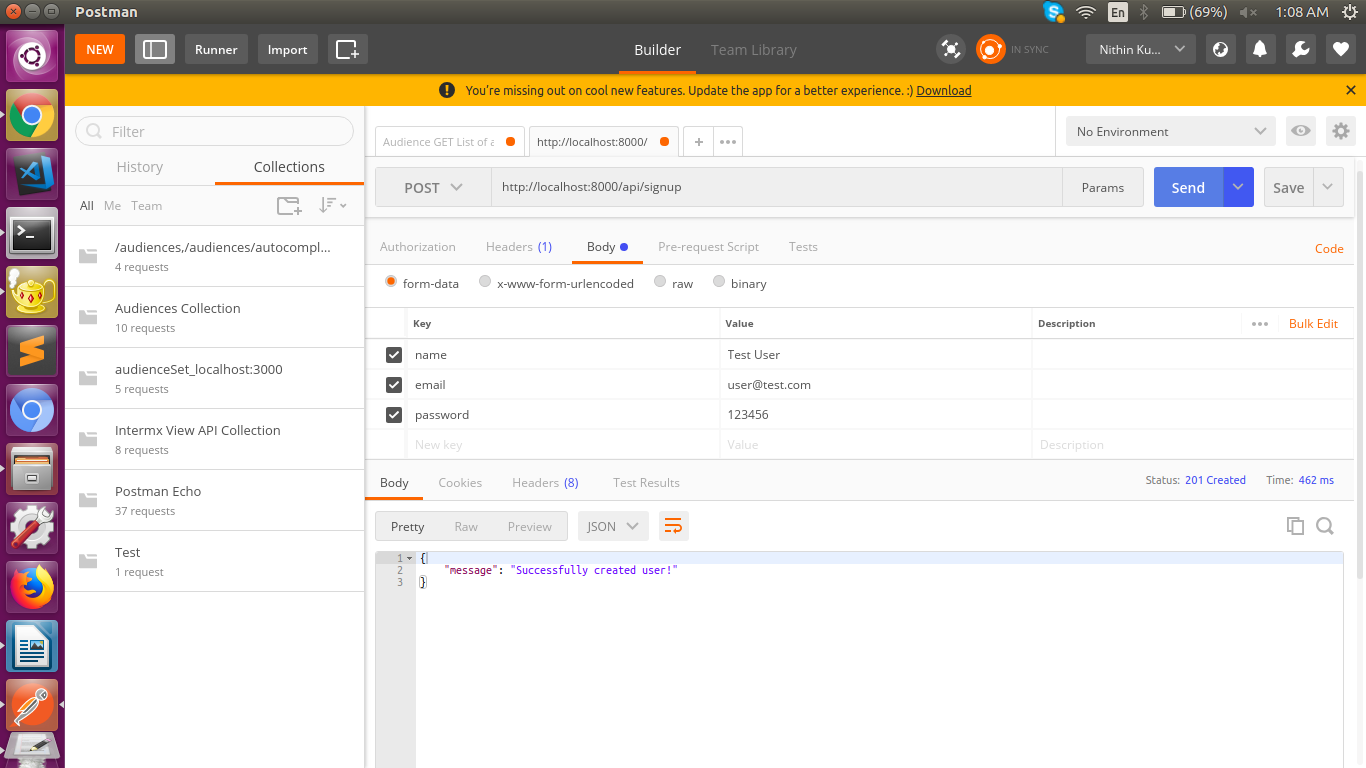
We have various client tools to test but here I am preferably using Postman so I have attached the screenshots for your reference below. And, one thing we have to note down here is that for both signup and login APIs, we have to set the header as below:
Accept: application/json
Sign up

Though Laravel’s token system was fine enough—but it wasn’t much secure. But Passport mechanism we have discussed here will provide full OAuth2 server implementation for your Laravel application. I hope this article will give you a clear idea on implementing Laravel Passport API authentication.
[contact-form-7 404 "Not Found"]
Like to read more from Laravel Developers? Don’t miss out to read more from the great minds in the industry!
“Contact us today to get free 20 hrs of consulting & proof of concept from experts”


